background

Monday, February 28, 2011

Craft Failure and Craft Success


Sometimes you just have to fail. This was a frustrating failure though. The project from beginning to end was horrible. I broke two needles, and the strips of fabric kept catching on the presser foot. The kids kept trying to talk to me and I was already SO frustrated that I ended up being frustrated with them.

(not fair, bad mom...I KNOW)

When it was done it was colorful, but horrible. Misshapen, oblong...AWFUL. But, I'll still keep it, failures can be good things. They make you remember how NOT to do things, which is good. But more importantly, it's how you learn. (This is where my 11 years of technical support comes in handy) I know now to use another presser foot, and to roll and secure the fabric before I start...and I know to use a big, sharp needle. And I know to wait until the kids are asleep for this one. I will revisit this again because I like the idea of being able to use up my little bits of fabric.

(especially the fabrics that aren't your favorite because the pattern doesn't show as much)

((and especially for the fabrics that ARE your favorite because you will smile every time you look at the bowl...like the Lime Dot in the middle of this one))


Thankfully, this day had a craft-silver-lining; in the evening after I put the kids to bed I turned on the Oscars and set out to learn how to knit a cable. With the Stitch n' Bitch book on my lap and the Oscars on the tube I made this neat little cable. It was SO easy, I was really surprised. It seems like my knitting learning curve gets steeper and steeper, so it was nice to have an easy win.

I have so much more respect for knitters now. I had no idea the time and energy and patience that went into these projects. It really is amazing.

Sunday, February 27, 2011

Homemade Orange Soda

Theirs:

Carbonated water, high fructose corn syrup, citric acid, sodium benzoate, gum arabic, natural flavor, glycerol ester of wood rosin, yellow 6, red 40, brominated vegetable oil

Mine:
Orange Juice, water, sugar, yeast


These are two very different sodas, in taste, appearance and contents. Really they aren't even comparable. What we made was more akin to Orangina than store bought Orange Soda. (thankfully I love Orangina)


The process takes 1-3 days and has the potential of exploding (if too much gas is produced) or being flat (if none is produced) and eventually if left on the shelf too long would resemble some kind of wine. In fact homemade soda does have very small amount of alcohol in it, due to the process of fermenting with yeast. Of course you'd have to drink gallons to have any ill effects...and I think your body would be more concerned with the amount of liquid in it than it's alcohol content.

Fermentation of glucose. One glucose molecule is converted into two ethanol molecules and two carbon dioxide molecules:

C6H12O6 → 2 C2H5OH (alcohol) + 2 CO2 (fizzy deliciousness)


But, when we opened the bottle for the first time we could definitely smell the yeast/alcohol. It didn't stop us from tasting it, but it did cause me to stop and do some research on it. All sources I've found so far say that it has less than 1%, and one woman tested hers and it had 0.65%. Non-alcoholic beer has about 0.5%, beer about 4%, wine and wine coolers 10% to give you an idea.

The recipes I found varied greatly. So I got the general idea and tried my own way. I heated 3/4 cup of sugar with about 4 cups water, then I took it off the fire and added 4 cups of orange juice. Once it was cool enough I added the yeast, about 1 tsp. I did not strain it, and I bottled it within 10 minutes of adding the yeast (In a leftover 2L soda bottle). I made the soda at 3pm on Thursday and by night time I think it was ready (ready=you can feel the plastic bottle firm up), but I waited until Friday morning before putting it in the fridge. (refrigeration slows the fermentation to nearly a halt...but not quite)

I liked it, because of the slight "beer" smell it made me feel like I was drinking grown up soda. The kids tried it, but didn't love it. I think next I will shorten the fermentation time...with soda you want to stop the fermentation as soon as you have the desired level of carbonation. I think I will also strain it before I bottle it, to reduce the sediment at the bottom.

GingerAle is next, and this time I think I will stick with the recipe from Mother Earth News.

For another interesting read check out this post for homemade blueberry soda. She actually makes her culture, rather than buying and adding yeast.

Saturday, February 26, 2011

Some new ideas to try...


After my fun with crocheting jute twine last week, I found this ETSY store (sosorosey) with stacking jute twine bowls. I had been wanted to buy some wire produce hangers, you know the ones with the three hanging tiers? But I think instead I may try something like this. I think the bowls filled with produce might work out just right.


If not, there is the possibility of fabric bowls. I just threw away SO many scraps that would be good for this kind of project, so I'm kicking myself a little. But on the other hand, we're trying so hard to pare down what we have, I just can't keep loads and loads of stuff I might use. This bowl came from Oops I Craft My Pants, and has links the original tutorial on there. But honestly, I liked the way hers looked better than the original tutorial. This looks like a really fun project, and a good use of old fabric or even clothing or sheets or curtains.


Speaking of old clothing, this from ETSY shop Squirrellicious was made of old jersey t-shirts. I have some old shirts and sheets that I've kept around just in case...it's amazing how old fabric can become something new...and in this case REALLY amazing.
Friday, February 25, 2011

The Sister Pillow


After my almost giveaway yesterday I completed the sister pillow. I decided to make them different, but in the same style. I used the same yarn, but a slightly different sized block. I changed the placement a little, and some of the fabrics differ. I didn't have much choice on the fabrics...the ones that I used were among the last remaining dregs of some old favorites.


I love this one as much as the other, even though they are different I think they compliment eachother. (But I'm still not giving them away) Now I have to go back to the drawing board for the giveaway because I used up too much of the pretty yarn...I think there might be enough for a single coaster. Coaster for one anyone?


I'm kidding...but look what I did make with the scraps. I know it doesn't look like anything, but you should FEEL it. It's so soft and squishy. I finger-crocheted it late last night after I put the kids to bed. I was watching Netflix (such a time waster, but SO addictive) and lying in bed and I wondered what it would look like if I used my fingers to crochet the remenants of this gorgeous yarn. And here it is...I know it doesn't look like much, but it has SUCH potential. What a wonderful scarf it would make! The design would be loose and wild and so SO warm. I only wish I had more yarn!!! And I know it might seem strange to use your finger instead of a crochet hook, but honestly it was fun. And it might be a good way to show kids the process of crocheting, I might give it try on my kids and see how it goes. (Not with yarn this expensive though)

Thursday, February 24, 2011

A Case of the Greedies


I wrote a post about a giveaway I was going to have. I planned out the final product in my head and then set to work. The project took some twists and turns (literally) and became something a little different than I had planned. (All of my plans do this, so really I'm not sure I should ever plan anything) As it was coming together I began to fall in love with it. And by the time it was done, it could not be parted with. Something about the combination of colors and textures and techniques. Laurel loved it too and snuggled right in with the knitted center square...how can I part with it now?


That's right, I cannot. I think instead I will make it a sister and they will live in the camper with us. It's just the cheery colors we needed in there. I would like to recover the sofa in the camper with something more neutral and less La Quinta, and I think this pillow (and it's sister) would look right-at-home on a neutral colored sofa.


Sorry...the giveaway will have to wait a little longer.

Wednesday, February 23, 2011

A Brief Taste of Camper Life


The kids and I had to run to the new house yesterday, and while we were there I figured it was high time I start moving things into the camper. So I brought our games and some kitchen supplies and sheets. It felt good to start putting things into cabinets (thankfully we have a lot of cabinets).


We had a picnic in the camper (despite the gorgeous 70 degree sun outside), we played hide and seek (again, in the camper), we played Whack-a-Mole and dominoes (yep, in the camper). Apparently the kids were more excited by the camper than the introduction of early spring weather. Though, we did stop to look around to see if anything had bloomed yet...and it had!!!


Here is the view from the door of the camper, I can't wait until it's full and green. The telltale signs of future blooms are just starting to show and we were able to walk around the property and spot where things are going to bloom...and where we want to plant new things.

Monday, February 21, 2011

Knit Bunny


No, I didn't knit a bunny, but I was feeling crafty and not feeling plan-ny. So...I headed out to the garage (aka studio) and looked around at all that is left. I really want to use up some fabrics and sell some items before we move. I have so many fabrics that I really want to use up, rather than pack. But I wasn't ready to make something official, I just wanted to play around. So first I grabbed some felt and made a hair clip.


I thought I had worked through my crafty feelings for the day, so I went back into the house. But somehow, I just knew I wasn't done...so after another cup of coffee I headed back to the studio and started cutting. I wanted to make a square storage container that looked like a bunny. And I wanted to come up with the dimensions for a set of creature storage containers, so I picked a size and cut. In the end I didn't plan the size right because it came out more like a tote. (I think I needed to take up more on the bottom corners to make a square instead of a rectangle.) But it was cute anyway...perfect size for a couple of skeins of yarn and my needles. And with it filled up it stands on it's own, so in the end it became a very narrow fabric storage container. The nose and mouth I embroidered after the bag was done. (normally I'd do it before it was sewn together so that the stitch-work wouldn't show, but like I said I wasn't in the mood to plan) This took about 15 minutes for the bag and another 15 for the face. Not too shabby for a crafty Sunday.

Saturday, February 19, 2011

New Additions to My Blog Roll


I love blogs. Unlike Facebook, twitter and the like blogs give you a chance to learn something. It offers up a chance to see into the world of others and learn something new. I am picky about the blogs I read, but when I come across a good one I'm a pretty loyal reader. Heidi Swanson's (author of Super Natual Cooking) was the first blog I read, and I had no idea it was a blog (or what a blog was)...it was just a good website with great recipes updated all the time. She had a view of food that really spoke to me. Next came Amanda Blake Soule (of Soule Mama), when I happened upon her site she was writing about a birthday for her youngest in which all the other children were making the presents. The presents included wood crafts, sewing, painting and baking. The next post was about milking their own (borrowed) cow and making cream and yogurt and butter and cheese...I was hooked.


But, I'd never found a male-authored blog that I enjoyed. It makes sense, they're usually about cars or sports, which honestly don't interest me. But lately I've been researching homemade soda, disappointed to find that most people who make homemade soda use club soda and soda extracts. (Hardly homemade) So I searched "homemade rootbeer and sassafras and yeast" and up pops Hunter Angler Gardener with a full explanation of making a simple syrup directly from the root of the Sassafras. As a child I used to comb the woods and pull up Sassafras roots (one of the VERY few interesting things I learned in Girl Scouts...and honestly I think I learned it from my dad at a Girl Scout camp...so the credit is due him, not them...I'll skip that soap box for another time and just say that Girl Scouts could be so cool if they didn't limit it to making Coca Cola cake and selling cookies). We would bring back the Sassafras root and make tea. Root Beer isn't the root alone, which is what makes Root Beer so complex, I've seen recipes that include Wintergreen, clove, vanilla, etc. Strangely this guy didn't use the traditional method of making soda with yeast, which is what I'm anxious to try. But I give him mad props for foraging and making the syrup from scratch. You can tell by the title that the entire blog is about hunting and gathering. I'm less inclined to hunt myself, but the process of becoming so closely linked to the land interests Jon and I to no end. The more we read and learn, the more we want to read and learn. And I can honestly say that not a week goes by without mentioning the idea of moving west to buy a large farm, or even potentially as far as Belize. So a blog like this with like-minded people I find incredibly interesting.


I also found Urban Homestead about gardening sustainably on 1/5th of an acre. We have 2.5 acres at the new place, and will likely have a 1/4 acre garden...imagine the possibilities.

I love that there are amazing people out there doing amazing things that wouldn't think we're crazy for wanting to live the way that we want. The kind of people who would try and grow and preserve nearly all of their produce, raise animals for food and wool, who can and do make their own bread, cheese and clothes. This is the life we greatly want, and I love that there are others we can follow to learn and commiserate. So if any of these things interest you (and I realize they are not of the norm) I keep my blog-roll on the right side. At first glance they may seem unrelated, but to me they aren't. We desire to be as self sufficient as we can be...so the blogs range from crafting to gardening to cooking to building...all skills that get us closer to that goal. Take a look if you dare...it's addictive...and soon you'll want to throw caution to wind and buy a 400 acre farm in Missouri, make your own soda and spin your own wool.

Thursday, February 17, 2011

Crochet like your life depends on it...


I've been crocheting like there's no tomorrow. I did take a short break from crochet to knit on the way to the new house (Jon was driving) and then whilst doing manual labor there, I also took a break. But---it was only a physical break, in my head I was crocheting together the vines I tore off the porch, and the dried weeds I was pulling out of the patio. I was picturing loosely crocheted baskets made of Kudzu vines...I gotta do something with them, right? I wondered if it were possible...so today I looked around for something new to crochet. I started with jute twine and made a coaster sized square. Then I played around with some tulle ribbon, that looked awful. But the twine I liked and could picture a set of rustic placemats, or a table runner...obviously I could picture a floor mat, but I didn't feel like doing that much work today. (It's a little rough on the fingers after a while) So I decided on a simple manageable project, a potholder. When it was done, it was a bit plain. I knew I wanted something simple and rustic, but I didn't think embroidery thread or even yarn could hold their own against the twine (aesthetically speaking). So I took an old piece of fabric and cut one long 1" wide strip and a big plastic embroidery needle (yarn needle?) and freehanded a rustic heart.
Simple, cute and handy. Seriously, look how substantial the twine makes this. It's more of a trivet than a potholder (I guess that's what I had in mind...something to set pots on) Plus, it's twine...so I can put the big yucky cast iron pots on it.


Not to worry---it can handle it. Plus, I'm still going to revisit the vines idea...lord knows I have lot to pull down before spring starts springing. And if crochet doesn't work, I'll just have to try my hand at more traditional methods of basket weaving...heck you can't have too many skills, right? But imagine, Kudzu placemats, floormats, baskets, table runners...imagine the possibilities. I might need a bigger crochet hook though...

Wednesday, February 16, 2011

Crochet Jewelry: Matching Earrings


I couldn't resist some earrings to go with the bracelet I made. Especially now that I have shorter hair, earrings are a lot more fun to show off. So I threw these together with 15 beads and a light weight wire. I beaded up the 15 beads onto the wire, cast on, and then did a simple chain (bringing up a bead before I looped the wire to pull through). Finish the chain the same as regular crochet, cut the tail about 2-3 inches and pull it through the last loop. I then take the wires from either side and twist together. I fed the tails through a small jump ring and wrapped the wire around for a funky-finished look. I bought ear hooks that only required slipping the jump ring into place (as opposed to opening and closing it). And voila...finis. I finished the first one and put it on as I was making the second. Laurel came out and gasped as if I had created the most wonderful jewelry ever. (She's really an awesome kid and gives me WAY too much credit for being cool...wait till she grows up and realizes I am in fact a big goober!) Regardless if I'm cool or a goober (hopefully I'm somewhere in between) I hope she will always have a love of creating her own stuff. I think it's incredible to make something new, try something different and have a little fun! (and if it turns out awesome and wearable...all the better)

Warning---these are big---I wanted them that way, but you may not. With the type of ear hook and the size of the beaded earring it rests maybe an inch from my shoulder. (Shockingly light weight, but big nonetheless) So if you like something more moderate in size I'd halve the number of beads...or coil it up, make a figure eight, etc.

Monday, February 14, 2011

Why I Love Crochet Part 2


Jewelry. Yep...crocheted wire jewelry. That is why I love crochet. It takes zero skill and few materials...and in 15 minutes you can have some really awesome looking jewelry.

The idea came from Stitch 'n Bitch Crochet. I didn't think the directions were great, so I just tried it out. I strung the beads first, then cast on and did a simple chain, pulling up a bead before I looped over the wire and pulled it through. That's the entire process. For a single chain bracelet it takes about 15-20 small to medium beads, for a necklace 40+ (40 made a choker length on me).


The green bracelet was a single chain, then a double crochet; so that takes about 40 beads. The pink necklace had a focal piece, so I placed it in the middle of the beads as I was loading them onto the wire. Start small and play around, it really was a lot of fun. For $35 I got three spools of wire, three bags of beads, 5 crochet hooks (about 6.5mm, size 10 I think), a set of tools (pliers and cutters) and a bag of lobster clasps. So far 6 bracelets and 4 necklaces have been made, with plenty more wire and beads to go.

Friday, February 11, 2011

Why I love crochet...

It seems I'm bouncing back and forth...get frustrated with knitting, start crocheting...get frustrated with crocheting, go back to knitting. Get frustrated with both...read. I just started Emma, and of course I am in the beginning stages of knitting and crocheting...so I have added three obsessive things all at once. My poor husband and children...they've heard me say "wait until I've finished this row" way too many times to count. (And somehow I forget to stop at the end of the row...and so I have to tell them again to wait until the end of the row...hee hee)

Knit, crochet, read...that doesn't sound like a bad life. Of course it can't be like that every day. I've given myself a bit of a free pass since it was a birthday gift and I'm just learning. Plus, it was sort of a snow day yesterday...so that should count for something. We had 1+ inches of snow in the morning, melted by lunch with bright sun and 50 degrees for the rest of the day. That's my kind of snow. It was so nice outside I sat and read while the kids played in the snow. (Seriously, that's my kind of snow)


So here is crochet project number 1...a cowl. I like it. I have the same problem with the apparent addition of stitches. (I didn't count them, but the piece is much narrower at the bottom than the top...but it's a cowl...it's forgiving) I did the whole thing with a triple crochet (because I think it's pretty), and I can feel my fingers begin to pick up the natural rhythm of the process. I dig rhythms...makes everything flow so nicely. I still have my very duh moments where I can't remember what I just did...and I had several big fights with knotted yarn...but in the end I won and completed this project in about 2 hours (hard to count since you start and stop so many times...may have been more or less) But every time I wear it I will remember my very first crochet project.

I think I will make some coasters next...just to practice starting and ending with the same amount of stitches...I really need to figure that one out, otherwise every future blanket, sweater and sock will be crooked. (nobody likes a crooked sock)

Wednesday, February 9, 2011

I Knit a Sweater

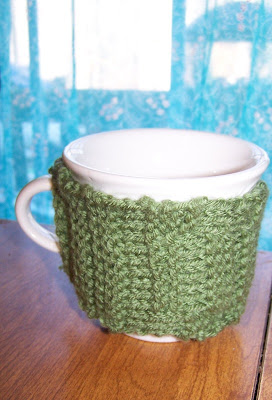
It's true. I did. I got knitting and crocheting things for my birthday 4 days ago so that I could learn to do both. I started with knitting and learned the basic stitches (is that what you call them?), then I played around with crochet, and then back to knitting. After 4 days of practice (raveling and unraveling the same yarn) I finally decided to complete a piece. So I settled on a sweater and began making it. Whew. It took about 2 hours to complete...and it isn't perfect. (Give me a break...I'm new to this) I also used this sweater as a chance to practice alternating between knitting and purling. In the end the effect is lovely, if not a little random.

So...here it is...my first sweater.


What, you thought I knit a REAL sweater??!?! Come on...that would be RIDICULOUS! I made a sweater for my coffee cup, similar to one I found on ETSY. (Except mine is not straight, has random holes and started with a row of 10, and somehow became 13...what's that about? (see?)


But I'm enjoying the process so far. I think I might actually like crocheting better...but I'll give it time. There is a skull sweater in one of my new crochet books that I can't wait to make for Luke...he'd be so cute in it!! (I will have to wait of course...until I get to that skill level) For now I'm content to practice and continue to ravel and unravel until I can figure out how I keep adding stitches to my rows. But I'm super duper glad that I have these new (very very new) skills to practice while I'm living in the camper. I think after a hard day of building, and then being trapped in the camper with sleeping kids and nothing else to do it will be great to have something to pick up and work on as I want.

Plus...since I have a sister and a sister-in-law who knit I have people to go to for questions...woo hoo!

Friday, February 4, 2011

Quilt Update


The front panel is really almost done now. Everything is pieced together and the turtles are appliqued and hand embroidered. I have a little bit more hand embroidering to do on other parts of the top before I quilt and bind. But before I do that, this is the point where I like to stare at it and bask at all the work I've put into it (and pray I don't mess it up on the next step).

I am absolutely NOT great at doing perfect things. Really. I like things that flow together, that don't take lots of planning, that don't need to be perfect. Quilts kind of need to be perfect, or close to it. So it seems like around now is when I start to sweat. So before the sweating and crying and praying and hoping commences I will take this time to love the work I've already done. And I do...I really do. I love the way the colors came together, I love the feel of the linen and I love that the mom and baby turtle came out well. (they came out less detailed than I had planned...but as it turns out I love their simple folk-ish quality)

See how I work? A little planning and a lot of flexibility. (Like when I had MUCH less linen than I realized and had to improvise a bit...wait till you see how I pulled that one together and made it look planned)

This is the last you will see of the quilt until it is finished. Until then, please think happy thoughts so that I don't ruin what I've already done.
Related Posts Plugin for WordPress, Blogger...