background

Showing posts with label skirt. Show all posts

Thursday, May 17, 2012

You Are My Sunshine Skirt (aka Crib Sheet Skirt Number 2)


After 2 solid weeks of rain the sun has finally come out in Southeast Alaska. In the last two days we have played on the playground, the beach and the backyard. After a long day of playing, I was tired (though the kids were not), so while they played in the backyard I made this skirt.


I didn't realize there was such a large remnant of the crib sheet left from the last skirt. I found it on the ground, and when I picked it up I realized it was the perfect size for a second skirt. I didn't have to do anything, it was already the right width and length. So I sewed up the back seam and appliqued on a hand cut sun. The heart was a late addition...to cover a hole I accidentally cut while trimming thread. (it happens) I love projects like this, quick, unplanned and cute. (oh, and FREE!)


So now we have rain-or-shine skirts...that way our fashion sense can be as fickle as our weather.

And don't think that's the end of the crib sheet just yet...I have one more project that's almost done.

Wednesday, April 25, 2012

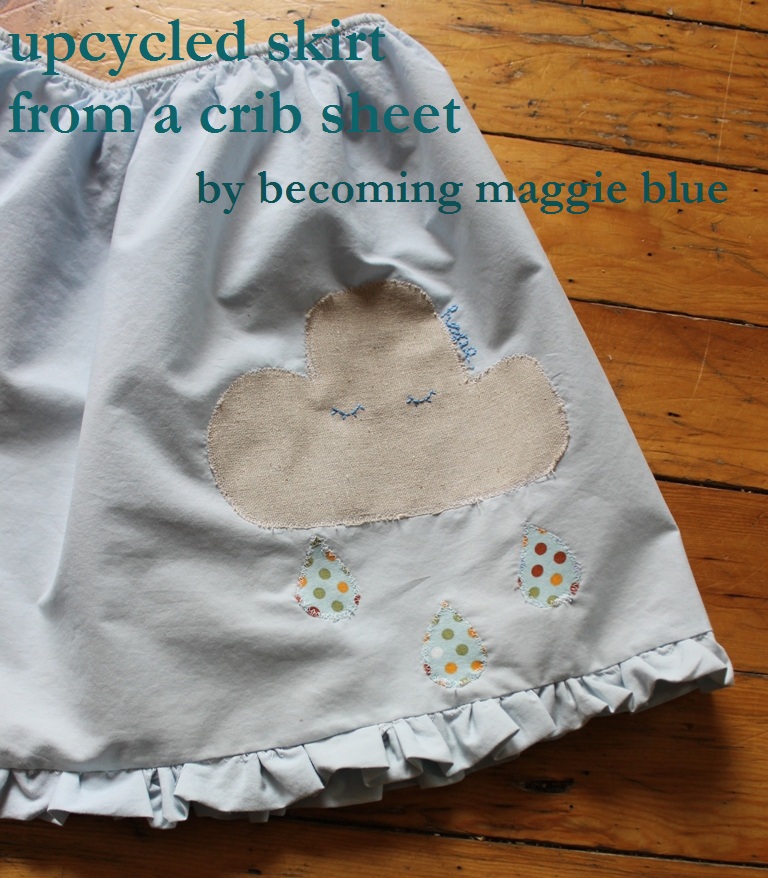
Upcycled Ruffled Skirt (from a crib sheet!)


Ok, I love this skirt. It made me smile every time I passed it by this afternoon. I've been playing around with the idea of this for a few days.


Generally my ideas start from random sketches, like this. I pick and choose what I like and modify it until I have a final project. (rarely does the original sketch look like the final product...each project takes it's own twists and turns)


I liked the idea of the cloud on the skirt, but I wanted a pretty blue fabric for the sky. I knew the exact shade, but I didn't have any fabric like that. So I began to go through old clothes for inspiration...suddenly I realized that the old blue crib sheet in the closet was the perfect color. Since I'm not having any more babies, and since it's faded after years of drooling and leaking diapers and washing, I didn't mind using it. Plus because of all the washings it's also a very soft, well worn fabric. Perfect. Upon first cut I figured I'd just use the fabric, till I realized that the elastic on mine wasn't in a casing, it was sewn directly to the fabric...I could use the elastic as-is and save myself some work and materials. (don't worry if yours IS in a casing, if you want to use it as-is you'll just need to stitch it in place before you cut so that it won't slip out)


First I took out the scissors and cut through the elastic at the corners, I also cut the seam at the corners so the fabric would lay more flat. Then I fitted the elastic around my daughter and cut the skirt width and length roughly to measure. (really roughly, this is a forgiving project) My daughter is a size 6, the elastic on the long side of the sheet fit perfectly with no additional trimming.


At the same time I cut the strips of fabric for the ruffle, since there is limited fabric on a crib sheet I cut the two strips out from below the skirt and pieced them together (like a quilt binding) to have enough fabric to ruffle around the whole skirt.


If you use the elastic on one whole side the sheet will have been folded in half, leaving only one seam to sew. So I sewed up the seam from top (elastic) to bottom first. Next I added the ruffle. Everyone has their own way they like to ruffle, I doubled the fabric over and used the folded edge for the ruffle bottom. Next I did a big zigzag stitch along the rough-edge side and ran a thread along the length of the whole strip. Then I pulled the string to ruffle it, pinned it on and sewed it in place.


Typically I would do the applique before I sew the piece together, but in this case I wanted to see the applique on the finished project to decide the placement. I freehand cut the cloud and raindrops and placed them on one at a time, zigzagging around each piece before putting the next one. With that done I hand embroidered the eyes and the word "hope." (If you've never done this part before, don't be afraid, just give it a try...it's super easy)


I have a few more sheets left, which is good because once you see the possibilities it's hard to resist...I've got a peasant top and harem pants lined up for the next two sheets.


Tuesday, April 17, 2012

A-Line Pocket Skirt: Pinterest Copy


I love Pinterest. I know I've said it before, but I do. I believe social media should be a positive sharing of ideas. (and without delving too deeply I find Twitter and Facebook to be used very negatively both in time wasted and information not gained) Pinterest on the other hand is rarely negative, and I have gathered more helpful ideas, craft and kid inspirations and recipes in a week than I would have otherwise gotten in YEARS of searching on my own. YEARS...and I stand by that.


(click on the pic to go straight to the tutorial on Whatever Dee Dee Wants)

But this isn't about my beliefs...this is about a skirt. An adorable skirt that I saw on Pinterest. I followed the link to the tutorial, gave it a quick browse and then decided to make my own. The project was very fast and very easy. I used an old pair of shorts as the measure for length and width and then I made my own pattern using some old coloring sheets that my kids had already used (they're huge, like 12 x 24...don't toss them, they make great kid patterns).


Notice I used the same fabrics as the Ugly Apron...but without the store bought teal binding it looks SO MUCH cuter. Unlike the tutorial I went with a pop of color on the pocket...she's 6...why not? And I love the look of the binding on the pocket edges...I already have several other dress, skirt and apron ideas based on this very simple pattern.


Once you have the knack you could make 2-3 in an hour if you wanted. I'm going to modify it further to make a t-shirt dress with the bottom looking a bit like this skirt. Seeing as I have more time on my hands this week (since it's National Turn off the TV week) I've started several projects...I'm also working on a knitted fish hat for Luke (also a Pinspiration), and guitar straps for the kids' guitars and a camera strap for me...and if I have time I'll finish up the projects from March that I still haven't finished (of course I should have done those first, but what fun would that be?).

Saturday, January 14, 2012

Snowy Crafting


Something about the snow falling outside makes me feel like hunkering down and nesting. I made cookies, gumbo, french bread and this cute little skirt and fleece boot liners.


I'd been playing around with the fleece liners/socks for a week now, tweaking it to get it just right. Then after seeing my friend Becca's cute boots with a knitted cuff I just had to complete a pair finally. The sock I made using a pattern I made from a store bought fleece sock, and with a few tips from this tutorial. Then I just added the cuff to fold over right at the top of the boots. (while you may have never seen these before these boots are a BIG thing here) I personally don't have a pair yet (ahem...birthday coming), but thankfully I wear the same size as my husband who got his for Christmas (hee hee). He respectfully requested that the fleece socks I make for him don't have whales on them...but he said he thinks they're cute.


Craft number two was also inprired by Becca. (go Becca!) She posted a skirt tutorial on Pinterest and after a trip to Rain Forest crafts where I bought some lovely ON SALE ($5.99!!!) Amy Butler prints I just couldn't resist. I always save Laurel's old jeans to make into skirts but I hadn't made any in SO long. So I sat on the floor, hacked off the bottom of the jeans and added the double ruffle. It is such a quick project since you use pre-existing pants for the top. Plus, since Laurel's waist doesn't change size often the waist of the jeans fits long after the bum has gotten too small.

I love days when I feel like I've accomplished a little something extra!! (especially when ruffles and button-eyed whales are involved)

Thursday, March 11, 2010

The Deconstruction of Jeans


It's the little things that make you realize you're much more like your mother than you realize. When my mom was the absolute busiest is when she decided she had to stop and make a pot roast. I'm not sure if it's avoidance of the things you have to do, or a personal challenge to do more than you must. Either way, I do the same with sewing projects.


 I needed to use today to make a birthday present...instead I decided to make this skirt. It has begun.

And since I'm confessing things here. I'll admit that the idea for this skirt was inspired by an episode of Buffy the Vampire Slayer that I saw many years ago. This was at the beginning of the internet phenomenon...so rather then google how to do it (how did we ever get along without the internet?) I just tried it myself with a beautiful silk fabric I had. It came out very cute, but not practical. It was floor length, and I didn't understand what to do with the crotch, so it kind of stuck out in the back.

 But I definitely felt like a hippy princess when I wore it.

I later tried again, and made the resulting skirt-flop into a bag. (my husband remembers that bag well because I had it on our very first date)

Somewhere along the way I realized what needed to be done to the crotch seam to make the skirt lay right, but I never revisited the idea. All of the sudden my daughter has been having growth spurts such that her legs are 4" longer and her waist is the same. What do I do with all those cute jeans? Most I've put in storage for a possible future baby girl...but really, why waste them all in hiding? So today I decided to deconstruct a pair of Laurel's old jeans in between other work. The trick is to remove the inside seam first so that you have a front and a back. Then go to front seam and remove the middle seam until just above the curve (you'll see).


You'll know you've pulled enough when the front piece flaps over the other and lays flat. Do the same in the back, though you will notice the flap in the back is larger then the one in the front.


I think it's best to pin and sew these flaps before moving on. Lay them flat now...you can see the beginning of the skirt. Figure out what length you want the skirt and cut the bottom off to size. I like it to fall just at or below the knee. (Any longer makes playing hard)


With the skirt still laying flat, place your fabric under the opening and cut it a little larger then the triangle opening. You can do this with one panel, a quilted panel, an appliqued panel...this is where you get to be terribly creative. You could even put a panel in and then applique something that stretches from the panel to the denim...it really pulls the design together (ok I'm biased...since that's what I did here).


Now pin and sew the front and back panels. I just place the panel underneath the opening and sewed over the already pressed denim. (when you deconstruct the legs the previous fold from the hem remains) At this point you can leave the bottom raw (not my favorite), or hem it under. 

It's as simple as that.

What do you think? Pretty easy, no? Terribly cute, yes?

Related Posts Plugin for WordPress, Blogger...