background

Showing posts with label craft. Show all posts

Tuesday, October 16, 2012

Baby Knits


A baby is always a good reason to knit. (especially if it's a long elfish hat) I always make these a little bigger than they need to be because I hate something that can be worn right away, and then never again. I wanted this hat to be good for a couple of years of wear. (the down side being it can't be worn until his head grows a little)


I normally hate pom poms...but somehow since it's a baby hat it just seemed naked without it. I actually haven't made a pom pom since about 1988, I learned it in Girl Scouts, made about 100 and then didn't make another until this project.

I wrapped it another of my leftover giveaway bags from way back in my ETSY store days. One of these days I will finally use the last one...till that day comes it saves me time and money to wrap it in a pre-made fabric bag. (plus it's good to keep trash out of the landfill, right?)


You know, I was cursing the bad weather...but it's gotten me back in a crafty frame of mind. More projects to come...


Monday, August 27, 2012

Wide Striped Curtains from Walmart Sheets


It seems like wide-striped curtains are all the rage on Pinterest, and while I didn't love it at first, it grew on me. But the dramatic navy/cream and black/white stipe combos were too much for my mostly earth-tone living room. I started to envision a tone-on-tone neutral stripe combination. But here in Alaska (and anywhere) to buy enough fabric for 4 full curtain panels is expensive.

What to do, what to do.

After some contemplating I remembered that Walmart sold their sheets in separates, so I could buy just the flat sheet...plus they offer a lot of color choices. And the sheets are $5! So 4 twin sheets later (2 tan, 2 brown) I had what I needed to curtain my entire living room.


I went with pretty wide stripes, cutting each sheet evenly into 4 strips and then combining them into 4 piles of strips to be put back together. Plus I used the pre-sewn hems to my advantage. The heights of the sheet was basically correct, so I just went with it. However, the sheet was too wide, so I eyeballed it and cut off about 18", leaving me with enough scrap to recover the rest of my couch pillows. Nice, huh?

Last but not least, I used the cheap white curtains that were already hanging on the curtain rod as lining. Since the width was different between the two (and because I'm lazy) I just centered the panel when sewing the top hem and sewed it inside the hem. It gives such a nice, heavy appearance, I think it made all the difference. (plus here in Alaska it made it nearly light-proof...perfect for those nights that should be dark but aren't...cause it's Alaska)


Tips:
1) Make sure to match the sheets on the same window. I used the top edge of both tan sheets to make both top panels for one window, and I used the bottom edge of the tan sheet for the other panel tops. (this way they automatically match without any additional measuring)
2) When sewing the strips together use the finished hem on one side and match up perfectly, once sewn together you can hem the other side so they both look even.
3) Pay attention when cutting and sewing so that everything ends up straight. Because I used the sheets natural length and hems I didn't really have to pay attention...but if I had paid a little better attention the strip on one of the panels might be a little more straight. But hey, I'm not a perfect gal, so it works for me, and you'd have to KNOW it wasn't straight to notice...I think.

Next time you're at the Walmart (necessary evil for me), walk through the sheets and see what I see...possibilities...cheap fabric in a variety of colors. I'm actually going to buy two more and make a couple of quick quilts for the kids that coordinate with the curtains and pillows...my kids love to snuggle up on the couch, and with fall weather coming soon, it's the perfect time.

Friday, May 25, 2012

Initials Pillow (and the last of the crib sheet)


RIP crib sheet, you have served me well. Who knew that one tiny, old, faded baby crib sheet could become: a skirt, a tooth pillow, another skirt and a couch pillow. (Not too shabby considering it wasn't serving any other purpose.) This was not the project I was trying to make. I was trying to frame this goldfish that Laurel made.


I wanted to mount it on burlap and frame it. But I didn't have enough burlap to cover the entire back, so I decided to sew on some small crib sheet scraps around the edges. But after putting strips around it, it still wasn't big enough...so I added another layer of strips. It looked so cool at this point that I added another layer. But without realizing I made it TOO big for the frame. (plus I really liked it)


So I thought I might make it into a wall hanging and then mount the paper fish on it, but I didn't think it did justice to itself (or the fish) that way. Finally I realized what a gorgeous pillow it would make. Rustic and simple, and very complementary to the pillow covers I made in January.


The pillow came together SUPER-quick. After I ended up with the trial-and-error front panel, I just freehand-cut my letters, pinned them in place and stitched around them. The longest part of the project was how long it took me to get to the store to buy stuffing (I live on an island so it doesn't take long to get ANYWHERE).


Every time I pass the couch and see this pillow it makes my heart smile. It will remind me of my husband and the nearly 10 years we've been together, and of my babies that used to sleep on that crib sheet. I love crafts with history, I want to fill my house with things that make my heart smile.


Now I have to figure out how to mount that fish...

Monday, May 21, 2012

A Kid Craft Weekend: Chickens and Pillows


projects made with love: by my kids, for my kids


Thursday, May 17, 2012

You Are My Sunshine Skirt (aka Crib Sheet Skirt Number 2)


After 2 solid weeks of rain the sun has finally come out in Southeast Alaska. In the last two days we have played on the playground, the beach and the backyard. After a long day of playing, I was tired (though the kids were not), so while they played in the backyard I made this skirt.


I didn't realize there was such a large remnant of the crib sheet left from the last skirt. I found it on the ground, and when I picked it up I realized it was the perfect size for a second skirt. I didn't have to do anything, it was already the right width and length. So I sewed up the back seam and appliqued on a hand cut sun. The heart was a late addition...to cover a hole I accidentally cut while trimming thread. (it happens) I love projects like this, quick, unplanned and cute. (oh, and FREE!)


So now we have rain-or-shine skirts...that way our fashion sense can be as fickle as our weather.

And don't think that's the end of the crib sheet just yet...I have one more project that's almost done.

Saturday, April 28, 2012

Bird Masks at Totem Bight


What better place to make a bird mask than the totem capital of Totem Bight Park? This is one of our favorite parks in Ketchikan, and usually our first tour stop when visitors come to town. In less than a mile you can see rainforest, ocean and totem poles. The view is gorgeous, the walk is easy, the totem poles are awesome...and if you're super lucky you might see a whale or two.


But today we weren't looking for whales...we were looking for birds. We're heading towards the end of the month-long Hummingbird Festival, and this was our last stop. The State Park was hosting a Breakfast with the Birds. This included a walking bird watching tour through the park, a pancake and sausage breakfast and a kids craft.


The kid craft came courtesy of Pinterest...shocker. I didn't know what to bring for an easy bird-themed craft...so I typed "bird craft" into the Pinterest search bar, and up popped Martha Stewart's paper mache bird masks. Now, I certainly wasn't about to do paper mache for this...but why not convert her more complicated project into one where I can use paper plates, construction paper and a glue stick?


The morning was gray and rainy---but don't feel too bad for us, that's just a normal day in Ketchikan---so despite the weather we had a good turn out. Everyone saw birds, got some good food and those that brought their kiddos made a mask. There were chickens, red robins, peacocks and so much more.


The project doesn't really need explanation, but just in case, I just cut the paper plates in half and cut out a slot for the nose. Then I used a hole punch to make the opening for the elastic band and also to make holes where the eyes would go (then I used scissors to open them up). Tie on the elastic, and then you're ready to decorate. There is no template to follow, the size of the beak depends on what you want, and the same goes with the feathers. The older your kids the more able they are to cut out their own pieces and decorate to their taste. But really, no matter how they decorate them they come out SO cute.


Wednesday, April 25, 2012

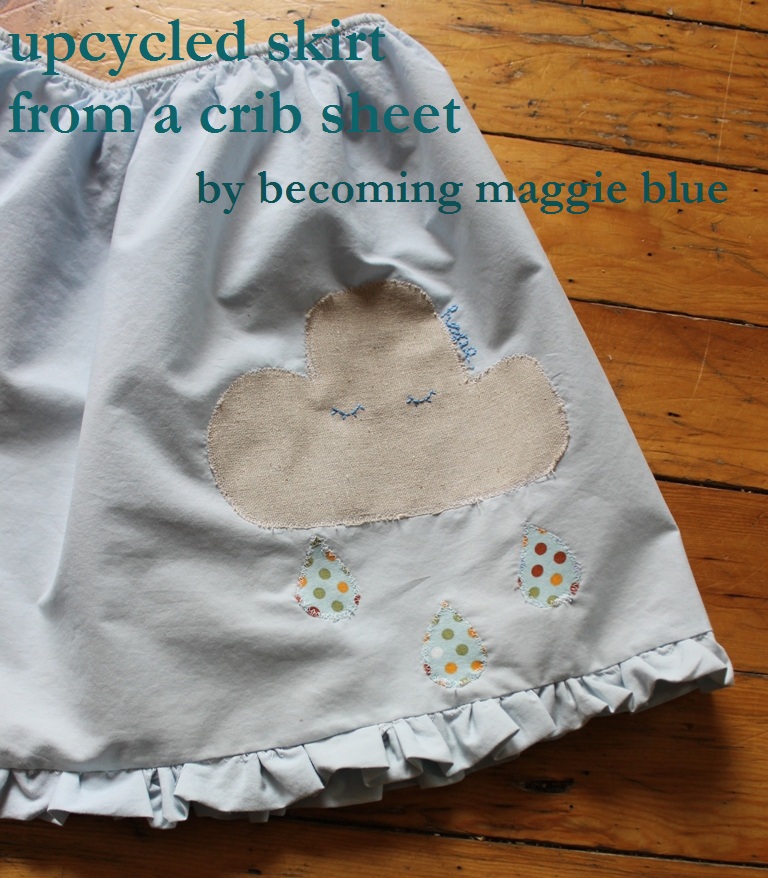
Upcycled Ruffled Skirt (from a crib sheet!)


Ok, I love this skirt. It made me smile every time I passed it by this afternoon. I've been playing around with the idea of this for a few days.


Generally my ideas start from random sketches, like this. I pick and choose what I like and modify it until I have a final project. (rarely does the original sketch look like the final product...each project takes it's own twists and turns)


I liked the idea of the cloud on the skirt, but I wanted a pretty blue fabric for the sky. I knew the exact shade, but I didn't have any fabric like that. So I began to go through old clothes for inspiration...suddenly I realized that the old blue crib sheet in the closet was the perfect color. Since I'm not having any more babies, and since it's faded after years of drooling and leaking diapers and washing, I didn't mind using it. Plus because of all the washings it's also a very soft, well worn fabric. Perfect. Upon first cut I figured I'd just use the fabric, till I realized that the elastic on mine wasn't in a casing, it was sewn directly to the fabric...I could use the elastic as-is and save myself some work and materials. (don't worry if yours IS in a casing, if you want to use it as-is you'll just need to stitch it in place before you cut so that it won't slip out)


First I took out the scissors and cut through the elastic at the corners, I also cut the seam at the corners so the fabric would lay more flat. Then I fitted the elastic around my daughter and cut the skirt width and length roughly to measure. (really roughly, this is a forgiving project) My daughter is a size 6, the elastic on the long side of the sheet fit perfectly with no additional trimming.


At the same time I cut the strips of fabric for the ruffle, since there is limited fabric on a crib sheet I cut the two strips out from below the skirt and pieced them together (like a quilt binding) to have enough fabric to ruffle around the whole skirt.


If you use the elastic on one whole side the sheet will have been folded in half, leaving only one seam to sew. So I sewed up the seam from top (elastic) to bottom first. Next I added the ruffle. Everyone has their own way they like to ruffle, I doubled the fabric over and used the folded edge for the ruffle bottom. Next I did a big zigzag stitch along the rough-edge side and ran a thread along the length of the whole strip. Then I pulled the string to ruffle it, pinned it on and sewed it in place.


Typically I would do the applique before I sew the piece together, but in this case I wanted to see the applique on the finished project to decide the placement. I freehand cut the cloud and raindrops and placed them on one at a time, zigzagging around each piece before putting the next one. With that done I hand embroidered the eyes and the word "hope." (If you've never done this part before, don't be afraid, just give it a try...it's super easy)


I have a few more sheets left, which is good because once you see the possibilities it's hard to resist...I've got a peasant top and harem pants lined up for the next two sheets.


Friday, April 20, 2012

Knitty Fish Hat


Another Pinspiration...made by me...but inspired (obviously) by Pinterest. I did not follow the free pattern, and chose instead to wing it. I also simplified it a bit, choosing not to do the shaping around the mouth. This hat is actually SUPER simple. If you can knit in the round, you can make this hat. The only strange thing I did was at the tail, and it was just because I didn't want to stop and look it up.


So here's my non-pattern...

Figure out the size of hat you need to make based on your yarn and needle size. Once you've done that cast on the lip color and knit until you get enough to roll up nicely (see how it looks like lips?) Then switch to the next yarn (keep them both attached) and alternate the colors any way you like.


Somewhere about halfway down the fish start reducing every once in a while. I knit-2-together every 8 stitches for a full round, then I just knit a few more rounds and decreased the same way again. It doesn't have to be exact, the point is to reduce slowly so that it looks even.

Once you've made it as long as you want, and decreased it enough, split the stitches evenly onto two smaller needles (or stitch holders); the front half of the hat on one needle, and the back half of the hat on the back needle. Then alternating one stitch from the front and one from the back place them on needle the same size as the circular. Once this is done you knit a couple of rounds and you'll see the increase for the tail (it sort of self increases since you "doubled" the number of stitches by going from circular to linear) Strange I know...I was just sort of winging it...but it worked.


After a few more rows you'll want to take half the stitches and put them on a holder. With half the stitches still on the working needle you can increase and decrease to your hearts content...every fish in the sea is different...so have some fun. But if it helps I increased 1 stitch on the right and the left on every knit row, 3 times, then I began to decrease 2 on the inner side of the fin while keeping the outer the same. Then towards the end I decreased 2 on the inside fin and 1 on the outside fin until I had just one stitch left, voila. Fin finis. (ha ha)

Tie on the yarn to the other half of the fin and repeat (or forget what you did and wing it like I did)...zoiks...what kind of knitter AM I?!?!

For the fins, this part was easy, I picked up 15 stitches for the top fin, then knit the front and back of every stitch so that the 2nd row has double the stitches. Then do a k1p1 rib until you like the length of the fin and bind it off. Easy Peasy. For the side fins I picked up 10 stitches, and the rest was the same. Now...once I did this I did not like the way the fin waved around, so I took the loose yarn ends and weaved the edges of the fin to the hat. Since there was an increase it naturally fans out to a rainbow shape, and holds it's shape better.


I liked the dead fish eyes from the original pattern, but Luke wanted a LIVE fish and requested button eyes (what can I say we LOVE Coraline). So button eyes it is. He loves this hat.

This pattern is super changeable so that your fish can be any color, length, size, etc etc. There is more than one fish in the sea you know! This is a fun knit, a quick knit and one that will delight the recipient (even if it's yourself). You can also use up your old scrappy yarn stash and make a rainbow fish. See how much fun this is...and you haven't even started yet!

Here is the original hat, click on the picture and it will take you to the original pattern.

Tuesday, April 17, 2012

A-Line Pocket Skirt: Pinterest Copy


I love Pinterest. I know I've said it before, but I do. I believe social media should be a positive sharing of ideas. (and without delving too deeply I find Twitter and Facebook to be used very negatively both in time wasted and information not gained) Pinterest on the other hand is rarely negative, and I have gathered more helpful ideas, craft and kid inspirations and recipes in a week than I would have otherwise gotten in YEARS of searching on my own. YEARS...and I stand by that.


(click on the pic to go straight to the tutorial on Whatever Dee Dee Wants)

But this isn't about my beliefs...this is about a skirt. An adorable skirt that I saw on Pinterest. I followed the link to the tutorial, gave it a quick browse and then decided to make my own. The project was very fast and very easy. I used an old pair of shorts as the measure for length and width and then I made my own pattern using some old coloring sheets that my kids had already used (they're huge, like 12 x 24...don't toss them, they make great kid patterns).


Notice I used the same fabrics as the Ugly Apron...but without the store bought teal binding it looks SO MUCH cuter. Unlike the tutorial I went with a pop of color on the pocket...she's 6...why not? And I love the look of the binding on the pocket edges...I already have several other dress, skirt and apron ideas based on this very simple pattern.


Once you have the knack you could make 2-3 in an hour if you wanted. I'm going to modify it further to make a t-shirt dress with the bottom looking a bit like this skirt. Seeing as I have more time on my hands this week (since it's National Turn off the TV week) I've started several projects...I'm also working on a knitted fish hat for Luke (also a Pinspiration), and guitar straps for the kids' guitars and a camera strap for me...and if I have time I'll finish up the projects from March that I still haven't finished (of course I should have done those first, but what fun would that be?).

Tuesday, October 11, 2011

My Very First Quilt


I made this quilt in November of 2009, it was the first quilt I ever made but I never got a chance to post about it. I thought about it because I just unpacked it from one of my MANY craft boxes. Seriously, all in all there were no less then 12 boxes for the craft room. Between books, fabric, yarn, beads, glass and paint I have more than filled the mudroom/craftroom/piano-room in our new home. (by new I mean REALLY old...and rented, so not ours at all...I'll save that for another day, but I'll tease you with trap doors and slanted floors...YAY!)

Since this quilt was the first I ever made it is uber important to me. I had always looked upon quilting as something I would never, could never do. All of those hours spent pouring over tiny bits of fabric, meticulously cut and placed. No thanks! I don't spend hours pouring over anything that is going to make me go blind. I am an ADD crafter...get in and get it done before I get bored.

But, thankfully it turns out I can quilt the same way I do everything else. I hate planning, I hate patterns...I like to sit down, decide what I'm doing and then do it. Sometimes the project takes a turn here and there, but that's what makes it fun! In this case I started as if I were making a basic strip quilt. I pieced together all the blues I had, and all the greens I had. Then I put the blue and green together to make the sky and grass. Next came the appliqued tree, which I did in corduroy because I wanted lots of texture for the baby.

At this point I carried the panel around with me everywhere I went because I was so proud of it. (I swear this is true) And if anyone stopped to ask about it I'd give them the old "What, this? It's just something I threw together..."


Since this new-old-rented-house-o-mine is painted with turquoise trim and orange walls I think my quilt will fit in just fine hanging on the wall. And if not, it doesn't matter because it makes me smile, so I'll hang it anyway.

Saturday, March 13, 2010

The Birthday Gifts


I finally finished the birthday gifts after I distracted myself with the jean skirt. I decided on a turtle bag and a rainbow-quilted colored pencil holder. The turtle purse design didn't come together the way I planned, I realized toward the very end that there was a flaw in my plan. So instead I basically made my turtle placemat (x2) then sewed them together leaving the top open.
I had some fun with the strap because I was running out of the coordinating Amy Butler scraps I had. So I quilted some pieces together and did some free form decorative stitching to pull it together. This is not the worlds most practical bag...but it's a turtle...I think it makes up in cuteness what it lacks in practicality. Laurel chose the hot pink button eyes, and I think it was exactly what it needed. (She even helped me stitch them on)
Then Luke, Laurel and I painted some newspaper for wrapping paper...and we were party ready.


The rainbow pencil holder really looks stunning with the pencils placed in their coordinating pocket. I take no credit for this...it was in Last-Minute Patchwork + Quilted Gifts by Joelle Hoverson. I was sad to have to give up my library copy this past Friday. The ladies behind the library counter were already pouring through it by the time I left with my new bounty. (The other Amanda Blake Soule book...MUCH happier with this one by the way) I really can't gush enough about Hoverson's book...get it, you won't be dissapointed. There are projects from the simple to the very advanced. I actually learned something so unknown to me that it has changed the way I think about sewing...and opened up even more doors for me. (I'll touch on this later) I was actually so confounded by the claim that I had to stop what I was doing one night and try it myself. In retrospect it makes perfect sense, and I realize now I was thinking about it all wrong. But I suppose that's what happens when you learn to sew as-you-go. How exciting though, to learn something that seemed quite impossible before.
And to the Tolmich's who hosted the party...you have just an awesome family. I was so impressed with all of your girls. It's inspiring to meet such beautiful, thoughtful, helpful and intelligent girls (and funny to boot).

(This is my latest hair-flower. It was going to be a gift, but Laurel claimed it for her own. I'll do this how-to next, it's such a quick easy project)
Related Posts Plugin for WordPress, Blogger...