background

Showing posts with label kids. Show all posts

Wednesday, March 6, 2013

Navigation Project and a Beautiful Hike


Our weather took an amazing turn for the better this week.  We have had sun since Sunday...that's FOUR WHOLE DAYS!  When the weather is good here, you take advantage of it.  Laurel and I have been hiking the same trail all week, partly because it's close, and partly because I wanted to show her how with hard work the trail would go from being hard to being easy. 


Success.  But it didn't come easy.  3 days equals three fights about not wanting to go, wanting to quit before we started, wanting to quit after we started...and I'm sure there were others.  We had to talk a lot about positive attitudes, postitive outcomes...but in the end, only my ugly voice would push her along.  Sigh. 

I digress.  The first day was just re-introducing ourselves to the trail.  The second day I let her take charge of leading me on the trail.  The third day we sat down and made maps to route our path to and from (and including) the trail. 


With maps in hand I let the kids lead the way, figuring out at every turn whether it was right or left, how to read street signs, how to look for landmarks and how to be safe.  


Getting to the trail is the hardest part (before the fun begins) and thankfully as the "leader" Laurel stepped up to the plate and tried to be a positive role model for Luke (instead of whining her way up the road like she had been).
 

I won't lie, hiking with kids is rarely 100% fun.  You have to coax and push and bribe and trick sometimes to get them to want to keep going. This time I was able to get them into trading off who was the leader every 3 minutes.  This allowed each to feel like the one in charge, and took us through the whole trail with no more whining. 


 And with kids sometimes you just have to stop and play, or eat or let them take charge of the camera.  It's always amazing to me how quickly a snack can boost their moods.


And when it's all said and done you get that one last amazing view of the insanely beautiful place we live. 


 Then the kids finished navigating us back to the house. All in all they did a great job getting us there and back.  They had a couple of wrong turns, but they got back on track and figured out not only how to make a map and plan a route, but how to follow the map to get there and back.  It was a fun project, a beautiful day and a fun morning with the kiddos.


Thursday, October 11, 2012

Solitude and mushrooms


Because of some unseasonably nice weather we put aside some homeschool time and went outdoors. Three trails in three days. We found plants and beauty and gorgeous vistas...and even some solitude. Laurel was mostly in charge of the camera and snapped pictures of everything from a squirrel to moss. (mostly mushrooms though)

And what I learned is that sometimes I need to slow down. Usually when we go out somewhere it's on my schedule. But the last few days hiking with a little buddy I realized that it's not all about me.

So I had to slow down...A LOT.

And stand still while she snapped pictures.

And accept it when she didn't want to learn what I wanted to teach.

And watch while she began to be captivated by the beauty around her (without mom to tell her how captivating it is).


I really had no idea how much more homeschooling was than just educating my child.

I'm starting to get it now.

Tuesday, October 9, 2012

Homemade Huckleberry Sauce


Not to be used until Thanksgiving...


Our weather has been so amazing lately that we have found ourselves out at a park or a trail everyday. We had planned to go out on the boat on Sunday for some crabbing and fishing, but the wind was blowing a little too hard for us. So instead...an impromptu trip to Settler's Cove for some beachcombing. Instead...we got distracted by the bright red huckleberries everywhere and picked until it was time to go home.


The whole family got in on the action.


Then after washing and picking over the berries I turned it into a huckleberry sauce, to be used in lieu of cranberry sauce for Thanksgiving.


We have one more day of good weather, so tomorrow we will pick some more for our annual Christmas Eve cran-horseradish dip (huck-horseradish in this case).

Huckleberry Sauce Recipe

4 cups berries
1 cup sugar
1 cup water

boil sugar and water, add berries and stir. Bring to boil and simmer for 10 minutes. Pour into sterilized jars.

Wednesday, May 23, 2012

Simple Sweeter Sweater


I actually finished this sweater months ago. Yep, months. It's been waiting for buttons all this time. I have been wanting to make my own homemade buttons from found driftwood. Likely it would take very little time to do it, but I just haven't had the chance to set up my miter saw since I moved. So finally, I gave up on waiting and bought these rustic looking buttons instead. Within 20 minutes I went from a project-in-waiting to an actual wearable piece. (I also found the striped boot cuffs I knit months ago that are just waiting for the fleece boot socks to be cut and sewn...another 20 minute project that is just waiting to be finished)


This wasn't a difficult sweater by any means, it's just a series of rectangles, five to be exact. I like asymmetry in a sweater, so that was the first detail I designed. Next I decided that I was going to use much bigger needles on the bottom and smaller on the top so that you get this ethereal fairy look to the piece. I echoed the shape of the sweater in the sleeves making romantic bell sleeves.


I used 100% cotton yarn for this, making it my first project completed in all cotton. I love the feel of a natural fiber; linen and cotton are my favorite. (I haven't tried bamboo yet, but I suspect it's similar) The only thing I would warn about is that cotton isn't as strong as other fibers, and tore relatively easy when I accidentally tripped on it. Though, I don't think it's normal to trip over your yarn, so I wouldn't take it too seriously.


Thursday, May 17, 2012

You Are My Sunshine Skirt (aka Crib Sheet Skirt Number 2)


After 2 solid weeks of rain the sun has finally come out in Southeast Alaska. In the last two days we have played on the playground, the beach and the backyard. After a long day of playing, I was tired (though the kids were not), so while they played in the backyard I made this skirt.


I didn't realize there was such a large remnant of the crib sheet left from the last skirt. I found it on the ground, and when I picked it up I realized it was the perfect size for a second skirt. I didn't have to do anything, it was already the right width and length. So I sewed up the back seam and appliqued on a hand cut sun. The heart was a late addition...to cover a hole I accidentally cut while trimming thread. (it happens) I love projects like this, quick, unplanned and cute. (oh, and FREE!)


So now we have rain-or-shine skirts...that way our fashion sense can be as fickle as our weather.

And don't think that's the end of the crib sheet just yet...I have one more project that's almost done.

Saturday, April 28, 2012

Bird Masks at Totem Bight


What better place to make a bird mask than the totem capital of Totem Bight Park? This is one of our favorite parks in Ketchikan, and usually our first tour stop when visitors come to town. In less than a mile you can see rainforest, ocean and totem poles. The view is gorgeous, the walk is easy, the totem poles are awesome...and if you're super lucky you might see a whale or two.


But today we weren't looking for whales...we were looking for birds. We're heading towards the end of the month-long Hummingbird Festival, and this was our last stop. The State Park was hosting a Breakfast with the Birds. This included a walking bird watching tour through the park, a pancake and sausage breakfast and a kids craft.


The kid craft came courtesy of Pinterest...shocker. I didn't know what to bring for an easy bird-themed craft...so I typed "bird craft" into the Pinterest search bar, and up popped Martha Stewart's paper mache bird masks. Now, I certainly wasn't about to do paper mache for this...but why not convert her more complicated project into one where I can use paper plates, construction paper and a glue stick?


The morning was gray and rainy---but don't feel too bad for us, that's just a normal day in Ketchikan---so despite the weather we had a good turn out. Everyone saw birds, got some good food and those that brought their kiddos made a mask. There were chickens, red robins, peacocks and so much more.


The project doesn't really need explanation, but just in case, I just cut the paper plates in half and cut out a slot for the nose. Then I used a hole punch to make the opening for the elastic band and also to make holes where the eyes would go (then I used scissors to open them up). Tie on the elastic, and then you're ready to decorate. There is no template to follow, the size of the beak depends on what you want, and the same goes with the feathers. The older your kids the more able they are to cut out their own pieces and decorate to their taste. But really, no matter how they decorate them they come out SO cute.


Wednesday, April 25, 2012

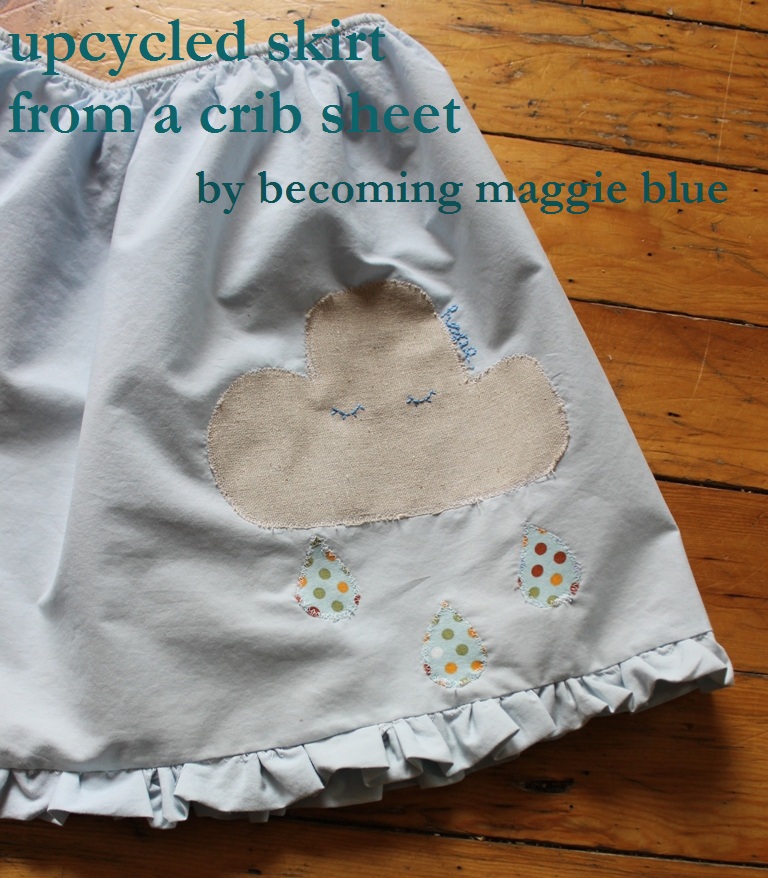
Upcycled Ruffled Skirt (from a crib sheet!)


Ok, I love this skirt. It made me smile every time I passed it by this afternoon. I've been playing around with the idea of this for a few days.


Generally my ideas start from random sketches, like this. I pick and choose what I like and modify it until I have a final project. (rarely does the original sketch look like the final product...each project takes it's own twists and turns)


I liked the idea of the cloud on the skirt, but I wanted a pretty blue fabric for the sky. I knew the exact shade, but I didn't have any fabric like that. So I began to go through old clothes for inspiration...suddenly I realized that the old blue crib sheet in the closet was the perfect color. Since I'm not having any more babies, and since it's faded after years of drooling and leaking diapers and washing, I didn't mind using it. Plus because of all the washings it's also a very soft, well worn fabric. Perfect. Upon first cut I figured I'd just use the fabric, till I realized that the elastic on mine wasn't in a casing, it was sewn directly to the fabric...I could use the elastic as-is and save myself some work and materials. (don't worry if yours IS in a casing, if you want to use it as-is you'll just need to stitch it in place before you cut so that it won't slip out)


First I took out the scissors and cut through the elastic at the corners, I also cut the seam at the corners so the fabric would lay more flat. Then I fitted the elastic around my daughter and cut the skirt width and length roughly to measure. (really roughly, this is a forgiving project) My daughter is a size 6, the elastic on the long side of the sheet fit perfectly with no additional trimming.


At the same time I cut the strips of fabric for the ruffle, since there is limited fabric on a crib sheet I cut the two strips out from below the skirt and pieced them together (like a quilt binding) to have enough fabric to ruffle around the whole skirt.


If you use the elastic on one whole side the sheet will have been folded in half, leaving only one seam to sew. So I sewed up the seam from top (elastic) to bottom first. Next I added the ruffle. Everyone has their own way they like to ruffle, I doubled the fabric over and used the folded edge for the ruffle bottom. Next I did a big zigzag stitch along the rough-edge side and ran a thread along the length of the whole strip. Then I pulled the string to ruffle it, pinned it on and sewed it in place.


Typically I would do the applique before I sew the piece together, but in this case I wanted to see the applique on the finished project to decide the placement. I freehand cut the cloud and raindrops and placed them on one at a time, zigzagging around each piece before putting the next one. With that done I hand embroidered the eyes and the word "hope." (If you've never done this part before, don't be afraid, just give it a try...it's super easy)


I have a few more sheets left, which is good because once you see the possibilities it's hard to resist...I've got a peasant top and harem pants lined up for the next two sheets.


Tuesday, April 17, 2012

A-Line Pocket Skirt: Pinterest Copy


I love Pinterest. I know I've said it before, but I do. I believe social media should be a positive sharing of ideas. (and without delving too deeply I find Twitter and Facebook to be used very negatively both in time wasted and information not gained) Pinterest on the other hand is rarely negative, and I have gathered more helpful ideas, craft and kid inspirations and recipes in a week than I would have otherwise gotten in YEARS of searching on my own. YEARS...and I stand by that.


(click on the pic to go straight to the tutorial on Whatever Dee Dee Wants)

But this isn't about my beliefs...this is about a skirt. An adorable skirt that I saw on Pinterest. I followed the link to the tutorial, gave it a quick browse and then decided to make my own. The project was very fast and very easy. I used an old pair of shorts as the measure for length and width and then I made my own pattern using some old coloring sheets that my kids had already used (they're huge, like 12 x 24...don't toss them, they make great kid patterns).


Notice I used the same fabrics as the Ugly Apron...but without the store bought teal binding it looks SO MUCH cuter. Unlike the tutorial I went with a pop of color on the pocket...she's 6...why not? And I love the look of the binding on the pocket edges...I already have several other dress, skirt and apron ideas based on this very simple pattern.


Once you have the knack you could make 2-3 in an hour if you wanted. I'm going to modify it further to make a t-shirt dress with the bottom looking a bit like this skirt. Seeing as I have more time on my hands this week (since it's National Turn off the TV week) I've started several projects...I'm also working on a knitted fish hat for Luke (also a Pinspiration), and guitar straps for the kids' guitars and a camera strap for me...and if I have time I'll finish up the projects from March that I still haven't finished (of course I should have done those first, but what fun would that be?).

Saturday, January 14, 2012

Snowy Crafting


Something about the snow falling outside makes me feel like hunkering down and nesting. I made cookies, gumbo, french bread and this cute little skirt and fleece boot liners.


I'd been playing around with the fleece liners/socks for a week now, tweaking it to get it just right. Then after seeing my friend Becca's cute boots with a knitted cuff I just had to complete a pair finally. The sock I made using a pattern I made from a store bought fleece sock, and with a few tips from this tutorial. Then I just added the cuff to fold over right at the top of the boots. (while you may have never seen these before these boots are a BIG thing here) I personally don't have a pair yet (ahem...birthday coming), but thankfully I wear the same size as my husband who got his for Christmas (hee hee). He respectfully requested that the fleece socks I make for him don't have whales on them...but he said he thinks they're cute.


Craft number two was also inprired by Becca. (go Becca!) She posted a skirt tutorial on Pinterest and after a trip to Rain Forest crafts where I bought some lovely ON SALE ($5.99!!!) Amy Butler prints I just couldn't resist. I always save Laurel's old jeans to make into skirts but I hadn't made any in SO long. So I sat on the floor, hacked off the bottom of the jeans and added the double ruffle. It is such a quick project since you use pre-existing pants for the top. Plus, since Laurel's waist doesn't change size often the waist of the jeans fits long after the bum has gotten too small.

I love days when I feel like I've accomplished a little something extra!! (especially when ruffles and button-eyed whales are involved)
Related Posts Plugin for WordPress, Blogger...